1. Initial Setup#
This section has steps for importing the Crest content into a project, and for adding a new ocean surface to a scene.
Warning
When changing Unity versions, setting up a render pipeline or making changes to packages, the project can appear to break. This may manifest as spurious errors in the log, no ocean rendering, magenta materials, scripts unassigned in example scenes, etcetera. Often, restarting the Editor fixes it. Clearing out the Library folder can also help to reset the project and clear temporary errors. These issues are not specific to Crest, but we note them anyway as we find our users regularly encounter them.
To augment / complement this written documentation we published a video available here:
Fig. 1.1 Getting Start with Crest for BIRP#
Fig. 1.2 Getting Start with Crest for HDRP#
Fig. 1.3 Getting Start with Crest for URP#
1.1. Requirements#
Unity: 2022.3.62f3 or later
Shader compilation target 4.5 or above
Crest does not support OpenGL or WebGL backends
The Crest example content uses the post-processing package (for aesthetic reasons). If this is not present in your project, you will see an unassigned script warning which you can fix by removing the offending script.
The minimum HDRP package version is 10.10
The minimum URP package version is 10.10
1.2. Importing Crest files into project#
The steps to set up Crest in a new or existing project are as follows:
1.2.1. Pipeline Setup#
Ensure that BIRP is setup and functioning, either by setting up a new project using the BIRP template or by configuring your current project. This is beyond the scope of this documentation so please see the Unity documentation for more information.
Switch to Linear space rendering under . If your platform(s) require Gamma space, the material settings will need to be adjusted to compensate. Please see the Unity documentation for more information.
Ensure that HDRP is setup and functioning, either by setting up a new project using the HDRP template or by configuring your current project. This is beyond the scope of this documentation so please see the Unity documentation for more information.
Ensure that URP is setup and functioning, either by setting up a new project using the URP template or by configuring your current project. This is beyond the scope of this documentation so please see the Unity documentation for more information.
Switch to Linear space rendering under . If your platform(s) require Gamma space, the material settings will need to be adjusted to compensate. Please see the Unity documentation for more information.
1.2.2. Importing Crest#
Import the Crest package into project using the Asset Store window in the Unity Editor.
The files under Crest-Examples are not required by our core functionality, but are provided for illustrative purposes. We recommend first time users import them as they may provide useful guidance.
Tip
If you are starting from scratch we recommend creating a project using a template in the Unity Hub.
1.3. Adding Crest to a Scene#
The steps to add an ocean to an existing scene are as follows:
Create a new GameObject for the ocean, give it a descriptive name such as Ocean.
Assign the OceanRenderer component to it. This component will generate the ocean geometry and do all required initialisation.
Assign the desired ocean material to the OceanRenderer script - this is a material using the Crest/Ocean shader.
Set the Y coordinate of the position to the desired sea level.
Tag a primary camera as MainCamera if one is not tagged already, or provide the Camera to the View Camera property on the OceanRenderer script. If you need to switch between multiple cameras, update the ViewCamera field to ensure the ocean follows the correct view.
Be sure to generate lighting if necessary. The ocean lighting takes the ambient intensity from the baked spherical harmonics. It can be found at the following:
Tip
You can check Auto Generate to ensure lighting is always generated.
To add waves, create a new GameObject and add the Shape FFT component. See Waves section for customisation.
Any ocean seabed geometry needs set up to register it with Crest. See section Shorelines and Shallows.
If the camera needs to go underwater, the underwater effect must be configured. See section Underwater for instructions.
1.4. Frequent Setup Issues#
The following are kinks or bugs with the install process which come up frequently.
Errors present, or visual issues
Try restarting Unity as a first step.
Compile errors in the log, not possible to enter play mode, visual issues in the scene
Verify that render pipeline is installed and enabled in the settings. See the follow for documentation:
Possible to enter play mode, but errors appear in the log at runtime that mention missing ‘kernels’
Recent versions of Unity have a bug that makes shader import unreliable. Please try reimporting the Crest/Shaders folder using the right click menu in the project view. Or simply close Unity, delete the Library folder and restart which will trigger everything to reimport.
Ocean framerate low in edit mode
By default, the update speed is intentionally throttled by Unity to save power when in edit mode. To enable real-time update, enable Animated Materials in the Scene View toggles:
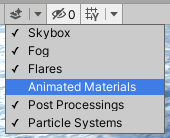
See the Unity Documentation for more information.
Ocean reflections/lighting/fog looks wrong HDRP
If reflections appear wrong, it can be useful to make a simple test shadergraph with our water normal map applied to it, to compare results. We provide a simple test shadergraph for debugging purposes - enable the Apply test material debug option on the OceanRenderer component to apply it. If you find you are getting good results with a test shadergraph but not with our ocean shader, please report this to us.
Changes made in prefab mode are not reflected in the scene view
Crest does not support running in prefab mode which means dirty state in prefab mode will not be reflected in the scene view. Save the prefab to see the changes.